When Should I Replace My Vapor Barrier? What Happens When A Vapor Barrier Fails?
A vapor barrier installed in your crawl space is critical in keeping moisture and pollutants out. Still, like any barrier or barrier system, its effectiveness will degrade over time. So, when should you replace your vapor barrier?
While a high-quality vapor barrier can last 10-20 years or longer with proper installation and maintenance, it is a good idea to periodically inspect your barrier for any damage, deterioration, or compromised areas that may allow vapor intrusion. Signs it may be time to replace your vapor barrier include tears, holes, peeling or curling edges, saturated patches, or visible moisture damage on foundation walls, joists, or the barrier itself.
Replacing an outdated or damaged vapor barrier will help ensure your crawl space remains dry, prevent costly foundation and structural repairs, and keep pollutants out of your living space for many years to come.
Signs You Need to Replace Your Vapor Barrier
The vapor barrier in your home is important in regulating moisture and keeping your environment comfortable. Over time, vapor barriers can start to deteriorate or develop holes and tears, making them less effective at preventing moisture migration. Here are some key signs that it may be time to replace your vapor barrier:
Excessive Moisture or High Humidity
When the moisture level in your crawl space rises noticeably, it means your vapor barrier is no longer preventing excess water vapor from coming through. The humid, damp conditions lead to issues like wood rot, mold, and mildew growth. If the crawl space smells musty or feels soggy, the vapor barrier has failed and needs replacement.
Visible Damage to the Vapor Barrier
Look for any holes, tears, punctures, or ruptures in the plastic vapor barrier lining your crawl space walls and floor. Even small holes and tears allow water vapor to penetrate, compromising the barrier. Patching damaged areas is only temporary. It is best to replace the entire damaged vapor barrier for effective moisture prevention.
If the vapor barrier is peeling away from the floor or wall surfaces, moisture can seep in behind the material. Loose or lifting edges are a sign the material has deteriorated over time and should be replaced. Installing a new vapor barrier with properly secured edges will form a tighter seal against moisture.
Water Stains or Leaks Appearing
If you notice water stains, leaks, or water pooling on the crawl space floor, walls, or wood structures, it indicates the vapor barrier can no longer prevent moisture from seeping in. The barrier has failed, and the water damage will likely worsen if not replaced.
Increased Utility Bills
A failing vapor barrier means more moisture enters the crawl space, leading to higher heating and cooling costs as more energy is needed to regulate the temperature. Your energy bills have likely increased if the vapor barrier is ineffective. Replacing the barrier will help improve energy efficiency and lower utility costs.
Older Than 10 Years
Plastic vapor barriers typically last 5 to 15 years with normal use before needing replacement. If your vapor barrier membrane is over 10 years old, it is nearing the end of its lifespan and may need to be replaced soon, even if damage is not yet apparent. As barriers age, they become more brittle and prone to tearing or developing holes. For the best protection, it is best to replace an older vapor barrier.
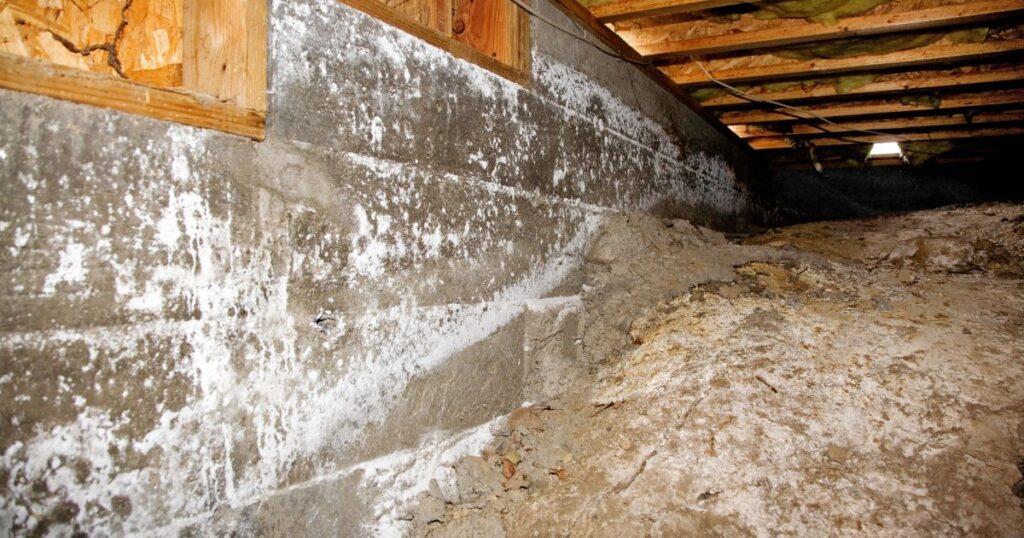
What Happens When A Vapor Barrier Fails?
When a vapor barrier fails or deteriorates, it can no longer effectively block moisture from seeping into walls and floors. Without proper moisture protection, several issues can arise.
Wall and Floor Rot
The most serious consequence of a failed vapor barrier is moisture damage to the building materials themselves. Over time, excess moisture seeping into walls and floors can cause wood rot, mold growth, and structural damage to framing members. Replacing deteriorated lumber can be an expensive and disruptive repair.
Mold Growth
With a non-functioning vapor barrier, moisture can accumulate behind walls and within floor cavities. This excess moisture creates ideal conditions for mold growth, which can pollute indoor air quality and pose health risks to occupants. Removing existing mold growth and installing a new vapor barrier is necessary to stop future mold issues.
Decreased Indoor Air Quality
Mold, mildew, and musty odors resulting from a failed vapor barrier negatively impact the indoor air quality of a home. Excess moisture trapped within walls can raise indoor humidity to unhealthy levels, making occupants feel uncomfortable. Replacing the vapor barrier helps improve air quality and comfort.
Structural Damage
In more severe cases of vapor barrier failure, the moisture accumulated within walls and floors over many years can cause major damage to structural framing members like studs, joists, and beams. Severe rot and deterioration of wood structural components may require extra repairs or reinforcement.
Increased Energy Bills
Excess moisture within walls also leads to compromised insulation performance. Wet or damp insulation loses much of its ability to regulate temperatures, leading to higher heating and cooling costs for homeowners. Replacing a failed vapor barrier helps insulation function properly again to improve energy efficiency.
VIDEO: How To Install Crawl Space Vapor Barrier
Here is a video demonstrating how to install a vapor barrier in a crawl space from start to finish.
Can You Put New Vapor Barrier Over Old?
So, it’s time to replace the old vapor barrier – but do you have to take it off to install the new one? Can you put the new vapor barrier over the old one? Yes. And while some experts might argue that it would complicate the new vapor barrier installation, it does offer its benefits.
Providing Additional Vapor Protection
The main reason to install a new vapor barrier over an old one is to provide an additional barrier against moisture. Even though the existing vapor barrier has likely done its job, it can become damaged or degraded over time. A new vapor barrier provides a fresh, intact layer to help keep moisture from seeping into walls and floors.
Protecting the New Vapor Barrier
Depending on the material, a vapor barrier only has an effective lifespan of 10-20 years before it starts to deteriorate. You can protect the newer layer during and after installation by installing a new barrier over the old one. Nails, screws, and other fasteners have less chance of puncturing the newer vapor barrier since it has the older layer underneath as a buffer.
Sealing Potential Leaks
Over time, the existing vapor barrier can develop holes, tears, and other leaks that allow moisture to seep through. Covering it with a new vapor barrier can help seal up any potential leaks that have formed. This ensures the vapor barrier system is working as effectively as possible to keep moisture out.
Providing a Better Seal
New vapor barrier materials may provide a more effective seal against moisture than the existing layer. Installing the newer material over the old one allows you to take advantage of potential improvements in vapor barrier technologies.
Minimizing Material Waste
Since a vapor barrier is already in place, you do not have to remove the old layer before installing the new one. This minimizes the amount of material that needs to be disposed of or recycled.
Take Action!
Replacing a damaged or outdated vapor barrier is essential in protecting your home from moisture damage and pollutants. If you notice any of the signs listed above, it is important to take action and replace the barrier as soon as possible. Doing so will help ensure your home remains healthy and comfortable for many years to come.

![How Do You Maintain Your Lawn? [5 Easy Steps]](https://www.homeimprovementdock.com/wp-content/uploads/2023/03/how-to-maintain-a-lawan-featured-image-768x384.jpg)


![How Much Does Crawl Space Vapor Barrier Cost? [Answered]](https://www.homeimprovementdock.com/wp-content/uploads/2023/08/How-Much-Does-It-Cost-To-Install-Vapor-Barrier-In-Crawl-Space-Answered-2-768x403.jpg)